
Creating your dream backyard doesn’t have to be complicated—or expensive. When we bought our home in May 2023, we envisioned a cozy outdoor space for our family to enjoy. Fast forward to today, and we finally built our DIY backyard firepit in just one afternoon for under $250! It’s an easy, budget-friendly project that instantly transforms your yard into a relaxing outdoor retreat.
Ready to tackle this DIY? Let’s get started!
Tools & Materials
Time Needed: 2 Hours
Tools
Materials
- Construction Adhesive
- Paver Sand
- Pavers Of Choice (We repurposed ours from an old walkway)
- Bricks or Stones of Choice (We used these Mini Flagstone Bricks)
- Black, Stainless Steel Fire Ring
- Rock Fill (Gravel)
- Pea Gravel
TIP: You can order a Fire Pit kit like this to make this project even easier.
Save this post for later!

Step 1: Choose and Prep Your Firepit Spot
The first step in creating a DIY backyard firepit is choosing the right location.
According to our city code, the firepit needed to be at least 15 feet from any structures or property lines.
We debated placing it at the very back of the yard for privacy but ultimately chose a spot closer to our deck and house. This placement allows us to keep the yard open for play while still enjoying our firepit now—and planning for future upgrades like a big patio for entertaining.
Once you pick the perfect spot:
- Place your fire ring in your chosen spot and use a tape measure to mark a 1-foot perimeter around your fire ring.
- Use a shovel to cut out a 1-2″ deep circle of grass, depending on the size of your pavers.
- Rake the soil level and tamp it down to create a stable base.

Step 2: Create a Firepit Base and Border
We repurposed old pavers from a walkway we removed in our yard to create a border under the fire ring. If you don’t have existing pavers, you can easily find similar ones at most home improvement stores.
- Next, add your paver sand to help level and stabalize your paver base.
- Begin set your pavers in a boarder around the circle where your firepit ring will sit. Wiggle each paver into the sand to level them as you go. Try to keep minimal gaps between each piece. Add more sand as needed.
- Next, fill in the gaps with pea gravel.
- Set the steel fire ring on top of this base, and level again as needed.
The border not only adds a finished look to your DIY backyard firepit but also gives you a spot to rest your feet while enjoying the fire!

Step 3: Stack the Firepit Bricks
We chose Mini Flagstone Bricks in warm, weathered tones for a rustic feel. You can also opt for larger bricks or different color options depending on your style.
- Stack the bricks in three rows around the fire ring, offsetting each layer for added stability.
- Use construction adhesive between the bricks for a more permanent structure (optional—we skipped this step temporarily for future yard updates).
Pro Tip: Allow gaps between bricks to improve airflow, which helps keep your fire burning strong.

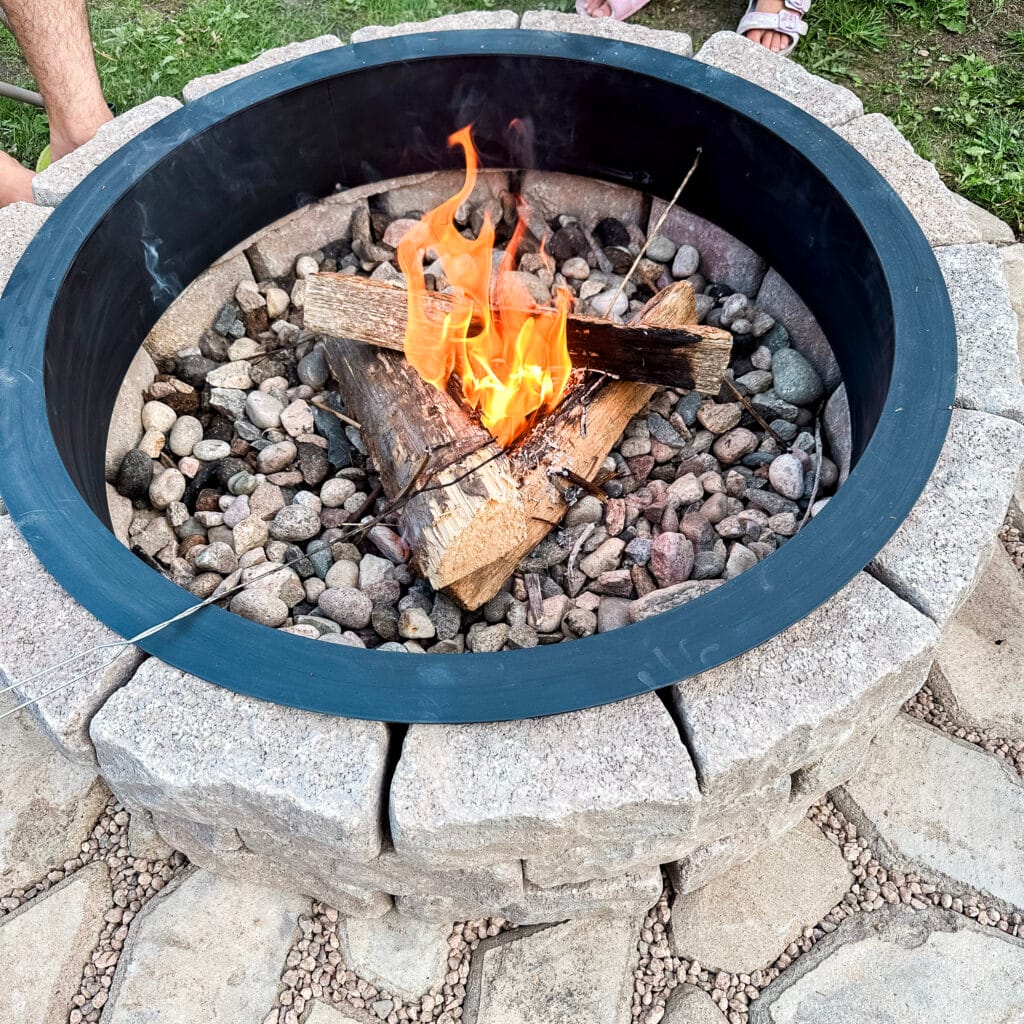
Step 4: Add Rock Fill and Final Touches
To complete your DIY backyard firepit, fill the center with rock and finish the edges with pea gravel if you haven’t done so yet.
- Add gravel or river rock inside the fire ring. This helps with airflow, keeps ash contained, and prevents pooling water.
- Fill the cracks between your border pavers with pea gravel to secure them in place. Avoid spreading pea gravel onto the grass to keep the area tidy.
That’s it! In just a few hours, you’ve built a beautiful, functional DIY backyard firepit that you’ll enjoy for years to come.

New to DIY’s? Download the free Ultimate Guide to Tools for Beginners!
DIY Backyard Firepit Tutorial: Summary
- Choose your firepit spot.
- Dig a hole for the paver base and level the soil.
- Place leveling sand and add the pavers, leveling as you go.
- Fill in the gaps with pea gravel.
- Add the firepit ring.
- Stack your bricks around it.
- Fill the center of the ring with gravel.
- Done!
Why We Love Our DIY Backyard Firepit
This project has been a game-changer for our outdoor space. Not only was it budget-friendly and quick to complete, but it also gave us a reason to get outside and enjoy our yard as a family. Especially while we continue to fix up this former hoarder home.

We repurposed materials we already had, picked up everything else at Lowe’s, and finished the firepit in one afternoon. Bonus: we even had time to enjoy s’mores with the kids that same evening!
Future Backyard Plans for our Fixer Upper
Our DIY backyard firepit is just the beginning. We’re slowly transforming our yard—planting grass, adding flower beds, and clearing out debris. (This before and after is unreal). Someday, we plan to extend a patio from our deck around the firepit for a complete outdoor hangout space.
If you’re looking for an easy, affordable way to upgrade your backyard, this DIY backyard firepit is the perfect project. It’s simple, satisfying, and creates a cozy spot to gather with family and friends.
TIP: To make it even easier, you can order a firepit kit online for a hassle-free setup!
Ready to build your own DIY backyard firepit? Grab your tools, find the perfect spot, and create a space that will bring years of enjoyment. You won’t regret it!
Share this post with a friend!