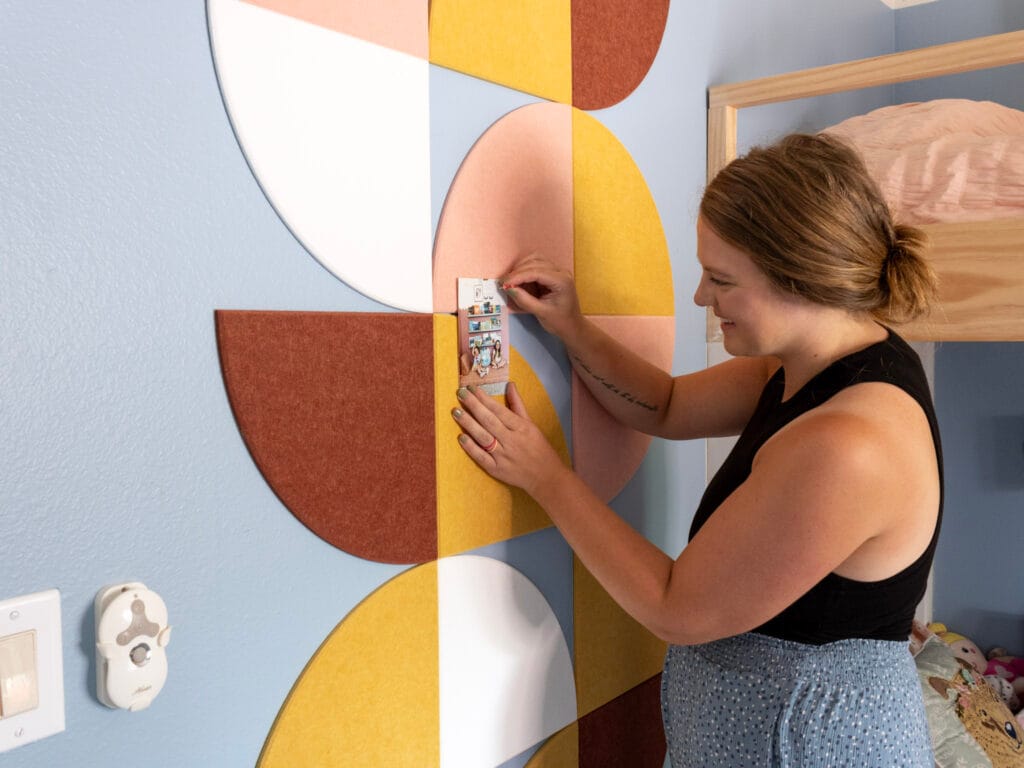
I’ve recommended these unique sound dampening tiles to my design clients for a while now, and finally had the opportunity to try them in our own home this week! Sharing my honest FeltRight wall tiles review below with thoughts on the quality, ease of install, and how they look in person.
Use code HILLHOMELOVE15 for 15% off your order!

One of my goals for the summer is to work on my girls’ bedroom. We threw a lot of it together to make it functional while we prioritized other spaces in our abandoned home.
But after a year of living here, we’re ready to be more intentional with our spaces. Starting with my kids’ room. My kids are collectors: papers, rocks, pictures, crafts. They keep *everything* and it quickly escalates into a cluttered mess in their room.
Enter: FeltRight wall tiles.

What are FeltRight Wall Tiles and How Do You Use Them?
These are sound dampening tiles that are made from recycled water bottles. They have so many amazing pre-made designs to choose from (I chose “Nectar”) and all of them are customizable.
You can also create your own design. I’ve seen some incredibly creative ones for kids’ spaces!
These can be a great solution to fill a big, blank wall and create a unique backdrop or accent wall.
FeltRight wall tiles stick right onto your walls, even walls with texturing, or to your ceiling.
For my home, the best part is that these tiles are thick enough to be used as a pinboard. I really want to facilitate a space for my kids that they can feel ownership over, and fill it with decor that reminds my kids of the people and places that mean the most to us.
A FeltRight wall tile pinboard is the perfect blend of aesthetically pleasing, creative, and functional to make this happen.
How to Install FeltRight Wall Tiles
It took a few days for my order to ship because they make these to-order to reduce their need for a big storage facility. It shipped within a few days and arrived in a well-packed box!
In the box
Each design comes with a printed pattern to follow and adhesive strips for the back.

They include detailed instructions on how to install each tile, including how many adhesive tabs to put on for each individual shape. I had a bunch of adhesive tabs left over so I wasn’t worried about making a mistake or running out.
I put three tabs on each quarter circle and so far it’s adhered really well to our textured wall. We have slightly textured walls with satin paint finish, and I didn’t have any problems with them sticking.
Layout & Measuring
Once I unpacked the box, I followed the pattern and set it up on the carpet next to where I wanted to install it. This gave me a visual for the final look to make sure I stayed on track.
Next, I used a large level, pencil, and tape measure to mark where the first tile should go. I drew a straight line along the level the width of the design (3 feet) to make sure the design stays straight. I did the same with a vertical line along the left-hand size.
Then, I started with the top right tile. I made sure the straight sides were level, and then from left to right installed the top row of tiles. Moving to the second row, I made sure each tile was straight before pushing the adhesive tabs into the wall. I pressed the tiles on for about 5 seconds on each corner. I erased the leftover pencil marks once I was done.
Row by row, I followed the pattern and got the whole design installed in about 20 minutes.
It was so simple, easy, and beginner-friendly! Anyone could tackle this project, even if you’re not handy.

Honest Review of FeltRight Wall Tiles
This is a super easy, affordable way to make a big impact on a blank wall. It’s simple to install, is creative and unique, and can add so much to your space.
These are renter-friendly, too. I had to remove a few in the install process, and the adhesive rolled off easily without damaging the wall.
I was worried about it looking tacky or like an office space, instead of a fun kids’ room. But in person it feels and looks great. It feels high quality, and is exactly what I was hoping for.

Since this is a small room that my kids share, every wall needs to serve a purpose. I moved their small bookcase by the window for now, but plan to replace it with DIY ledge floating bookshelves so they have less furniture on their floor. More room for play!
There’s lots more to finish in this space, and I’m hoping to knock it all out this summer.
- Paint bunk beds
- Build ledge bookshelves
- Build desk shelves
- Repaint the walls (had to repair some damaged drywall)
- Replace mismatched/poorly cut trim boards
- Paint their closet and bedroom doors
- Style the space
Follow along as we cross the finish line in here!
FeltRight Tiles Discount Code
Use code HILLHOMELOVE15 for 15% off your order.


2 Responses
Thank you so much for sharing your experience! I’m looking into Felt Right tiles for sound dampening in my home. Did you notice any sound difference in the kids room after installing these tiles?
Not a drastic difference, but definitely a little less “echo-y” through the wall if that makes sense! Honestly, every little bit helps ha!