
Today I’m sharing the step-by-step process for installing foundation wall anchors in our home. We hired a local foundation company to make this repair for us, and we learned a lot along the way!
See the FAQ’s on Foundation Wall Anchors here (cost, financing options, the type of company we hired, and more).
When do you need Foundation Wall Anchors?
Different levels of foundation movement require different repairs. Two independent companies recommended a Wall Anchor system to brace our foundation wall that has a a 2-3″ inward lean. This would permanently prevent any more movement.
Depending on the type of foundation you have and what the specific issue is (cracking, bowing, leaning, sinking), a foundation repair company or a structural engineer can tell you the best fix. This might include I-beams to brace the wall, straightening the wall, or even repouring/rebuilding part of the foundation entirely.
A common reason for foundation issues is water pressure. Hydrostatic pressure build up from excess water around the house caused our foundation to move 2-3″. I go more in-depth about the root cause of our leaning foundation here!
The Repair Plans – Installing Foundation Wall Anchors
The company we hired, Colorado Structural Repair (CSR), subcontracted an independent structural engineer on our behalf to create our foundation repair plans.
A Property Inspection & Structural Repair Plans
The owner of CSR and the structural engineer came to the house to take measurements and inspect the property.
Once the engineer had the measurements he needed, he created the structural repair plans. Then, CSR submitted the repair plans to our city to get the proper permits. It took about 6 weeks for the permits to get approved. Once it was approved, we cleared out our basement and scheduled a time for them to start!
Here was the specific plan for installing foundation wall anchors in our home:

Installing Wall Plates & Rods
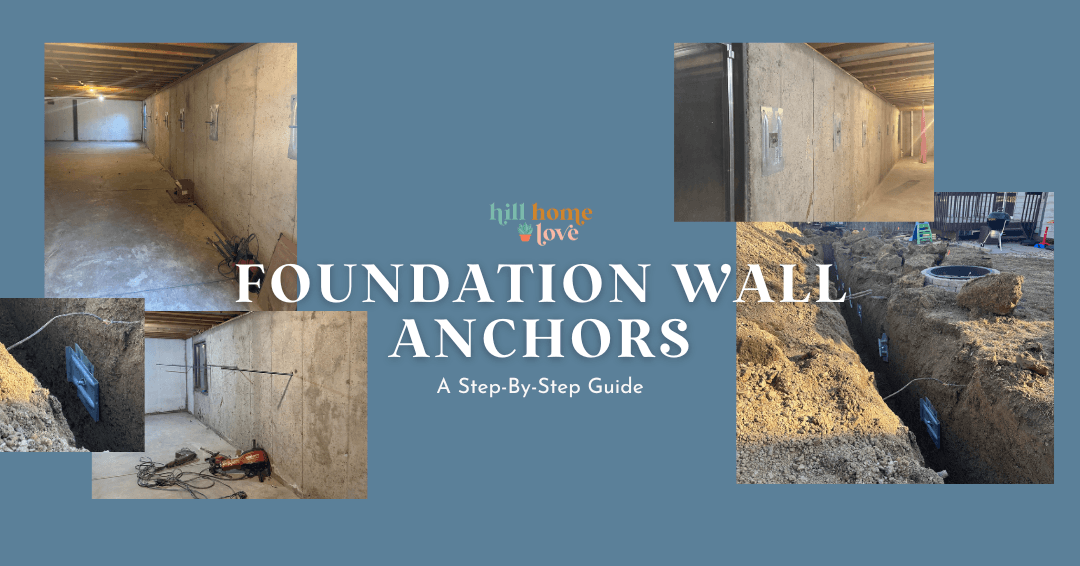
Once the crew arrived, the first step was to dig a trench.
They dug a 5-foot deep trench about 16 feet away from the house, the width of the house. The extended the length just a bit to avoid our firepit.

Next, they drilled 8 holes through our basement wall a few feet apart.

Next, they inserted big, steel rods through the holes and pushed them out into the trench in the yard at a downward angle. At the end of these rods, they added big metal plates. They added two on the trench side, creating an X with the metal plates.

On the basement side, they added wax rings underneath the wall plates. Most likely to seal against water entering through these holes. Then they trimmed the rods and secured the plates to the rods with a bolt.

A Second Inspection
According to our city’s regulations, another inspection was conducted by an independent structural engineer before the trench was filled in. The inspector arrived at the house to review the installation of these rods and plates, and signed off that it had all been done correctly.
Filling The Trench
After repairing some broken sprinkler lines, the foundation crew started filling the trench. Which turned out to be much more of a process than I expected! They filled in about a foot of dirt or less at a time. Then tamped down the dirt to compact it again. This took almost as long as installing the rods and anchors did! I’m not totally sure the reason for this step, but I trust our crew was following standard protocol for this.

Additional Repairs Made
The moving foundation created an additional issue that we needed to fix: a slipping sill plate. I go into detail in this post on what a sill plate is and why it’s essential in your home’s framing. Be sure to ask about the condition of your sill plate if you have a similar leaning foundation issue. They often go hand-in-hand.
Sill Plate Support
The 3″ of foundation movement had caused our sill plate to slip off our foundation in places, which meant the back wall of our entire house wasn’t being properly supported anymore. Yikes!
To fix this, they added angle iron beams to our foundation, underneath the siding.

This created a new “shelf” or an extension of the foundation for the sill plate to sit on.

Beam Pocket Repair
Our home sits on a slope, and foundation issues on our street seem to be common. Back in 2012, before we owned the home, a foundation repair was done on the West wall. This was a totally different type of repair, and we were informed about it before buying the house.
After moving in, we noticed that a beam pocket on the exterior of this wall had been exposed. We’re not exactly sure what this happened. Was the 2012 foundation repair failing? Or did this happen before the 2012 foundation repair? We had little information and context. But the cracks in the foundation were allowing water and moisture inside our home, so it needed re-sealing.

Our foundation repair company patched this crack. We’ll be able to monitor this wall for movement by tracking this beam pocket in the future. If more cracks appear, we’ll know there’s a deeper issue (meaning, this wall is moving too!).
What’s Next After Installing Foundation Wall Anchors?
Installing foundation wall anchors is a permanent fix for a leaning foundation. Or at least, it should be, we’ve been told. The company we hired offered a lifetime guarantee of this foundation repair. So if we encounter any future issues, they’ll come back and fix it.
Addressing Water Issues
The next step for us will be addressing excess water around our home. Even though this wall has been permanently stabilized, we want to give our foundation the best chance possible at remaining stable.
This means eliminating and moving as much water away from the foundation as possible, to minimize the hydrostatic pressure on our basement walls. Here are a few things on our last to do over the next few years:
- Relandscape and regrade the soil around the house to add a 5 foot slope away from the foundation.
- Add watertight landscape fabric in a 5 foot perimeter around the house to move water away.
- Add french drain(s) in the back yard.
- Ensure gutters are sloped and free of clogs, and extend downspouts as needed.
- Add sump pump(s) if needed in the future.
Finishing The Basement
Now that our foundation is repaired, we’re ready to start building our basement! Our goal for 2024 is to add at least one functional, finished room for a playroom/guest room. We’ve never done anything like this before so it will be an adventure. We’ll be getting a layout finalized soon, and then DIY working our way through plumbing, electrical, drywall, insulation, and more. Wish us luck!

What questions can I answer about installing foundation wall anchors?! I’ll answer below!