
Today I’m sharing all about our DIY Green Bathroom project. We wrapped up the last few tasks and are ready to just enjoy this beautiful room. I’m sharing links, DIY renovation costs, design regrets, and more.

We’ve FINALLY finished up this green bathroom renovation and I can spill all the source details in one spot for you. This was our first ever remodel project. We started a few months after we purchased our first home in 2019, and not on purpose. What started as a leaking shower turned into a total bathroom demo!
This project taught me a lot about what styles, hardware finishes, colors, patterns, and textures I love.
And how to design a unique room on a budget.

The Story Behind This 3-Year Remodel
What I learned most through this project was that you can build anything. You. Yes, you.
The phrase I kept repeating to myself when we were in the throes of this project, feeling discouraged like it would never get done, or like we didn’t have the right skills to keep going was this:
“We can always pay someone to fix our mistakes.”
That gave me the confidence to do lots of research for each small part of the project, and the courage to at least try.

Through lots of Googling and watching hours of videos on YouTube, we learned how to:
- Tile a floor.
- Build a shower.
- The best way to scoot a 300lb 90’s tub across a lawn using a moving system of old cardboard boxes, then leaving it on the curb for 1 week like hillbillies before someone would pick it up for removal. Just kidding, we didn’t need Google for that one.
And so much more.
After spending hours long watching professional Tilers share their fails and techniques on YouTube, I felt confident I knew the potential issues I’d encounter. I learned how to get tiles centered, straight, and just how much mortar to use to get it to adhere to the cement backer-board behind it. A moasic floor tile is particularly hard to install, and it was brave (insane) of me to attempt it first. You have to line up the spacing just right so that you don’t get visual lines throughout the final look.
I’m so damn proud of myself for getting it right the first time, and I attribute that to the prep work I put in to learn this new skill beforehand.

Jumping into a DIY without a plan, or rushing through it, easily leads to sloppy results. But we went slow and intentionally finished every little project in here to make it look professional.
Even though it took us a long time to complete–a lot of late nights, weekends, and preschool mornings–I have absolutely no regrets about doing it right the first time.


This green bathroom project was the reason I started HillHomeLove.
So it holds an extra special place in my heart.
Friends and family starting asking for updates on what bathroom project I was working on, and I wanted to find an easy way to share our projects with them.
Years before this, when we were living in a rental home, I had a dream of doing more with interior design and DIY’s.
I considered going back to school for an Interior Design degree. I even applied to a 4 year program and was accepted for the Fall of 2020.
But once I thought about the reality of having homework and tests again, while renovating our home with 2 small kids in our family… I changed my mind. Ha.
I started investing my time in learning Interior Design on my own, doing more DIY projects in our home, and helping others in their homes too.
HillHomeLove was born.

The response I received from new Instagram friends and in-person (is that the right word?) friends was so encouraging that I haven’t stopped.
It’s maybe one of the highlights of my life that other people enjoy our home design as much as I do.
Getting to help others in their home is icing on the cake.

I know this isn’t our Forever Home, but I’ll treasure this green bathroom project always.
For what it taught me about myself, my passions, and for helping me start a hobby-turned-job that is the most fun I’ve ever had.
THANK YOU for every conversation, like, comment, follow, or encouragement you’ve shared with us over the last 3 years about this project.


DIY’s Completed In This Room
We didn’t make any major structural changes in this room. We still have the same original doors and 90’s ledge/shelf thing above the doors. We didn’t want to mess with changing those structural elements, at least not right now. Here’s what we completed:
- Demo
- Shiplap Ceiling
- Floor Tile + Grout
- Shower Head + Valve, Waterline Extension, Walls, Half-Wall Build, Waterproofing, Tiling, and Grout
- New Tub installation
- New Toilet installation
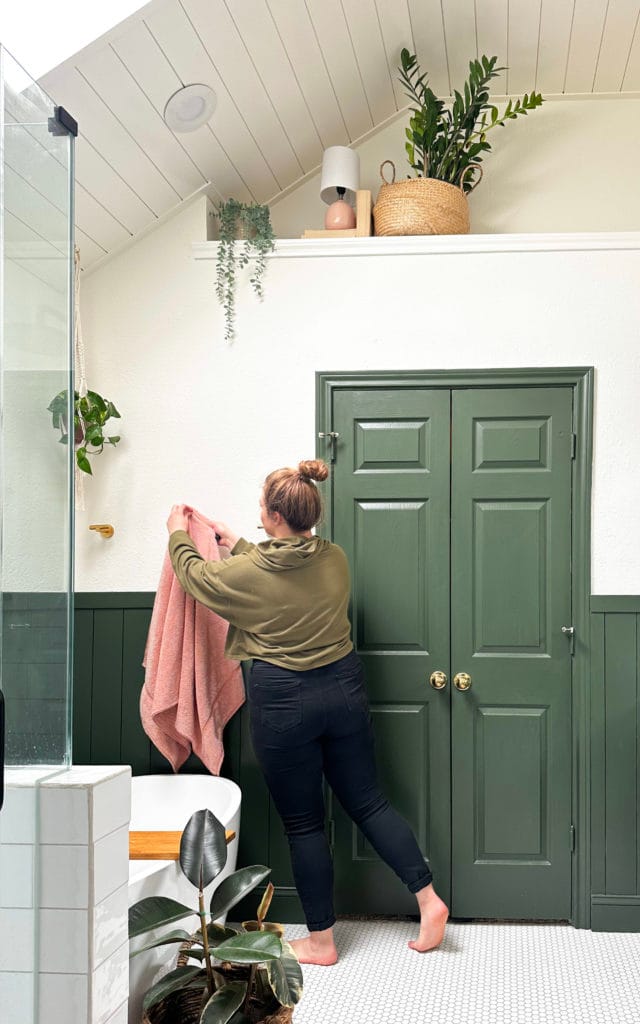
- Green Shiplap Half-Wall + Floor Trim
- Towel Hooks, Cabinet Hardware, + Toilet Paper Holder installation
- Cabinet Removal, Wall Repair, and Adding Open Shelving Above Toilet
- Macrame Hanging Plant Holder
- Recessed Lighting Replacement
- Painting Walls + Ceiling
Total Estimated Remodel Cost
Because we completed this remodel over the course of 3 years (!!), I can’t go back and get exact cost details.
But our best estimate on how much this total room transformation cost is about $8,000!
This would have easily cost over $20,000 to hire out. It left room in our monthly rolling budget to invest in a new deck outside, new furniture as needed, lighting upgrades, decor items, and other house projects like our upcoming hall bathroom remodel.

Paint + Grout Colors
- Green Shiplap: Backwood by Benjamin Moore in Satin
- White Upper Walls: Simply White by Benjamin Moore in Flat
- White Ceiling: Simply White by Benjamin Moore in Semi-Gloss
- Vanity Cabinet Color: Edgecomb Gray by Benjamin Moore in Semi-Gloss
- Shower + Floor Grout: Warm Gray by Mapei
Green Bathroom Before Photos


Green Bathroom Design Regrets
Getting a cohesive look over the course of 3 years was not easy. It took a lot of planning and intentionality.
My biggest regret is not choosing gold, vintage-style faucet hardware like I initially wanted.
But we started this project during the 2020 Pandemic, and by the time we were ready to make purchases, lots of products were back ordered or unavailable.
And suddenly much more expensive.
I found a gold, wall-mounted tub filler I loved and fit in our budget. But I couldn’t find a gold shower head with a matching valve that would match the tub faucet for under $200. Most would cost us $500+. This was way over budget for us.
So I went with matte-black, modern style tub faucet and shower head instead, and I so regret it.
I know they look nice, but they just aren’t my style. Especially when it came time to replace our sink faucets recently. They feel all wrong to me against the dark green shiplap.
Part of this regret just is not knowing what I liked!
In the span of 3 years, I learned a lot about my personal style preferences. I discovered that I love warm tones and gold finishes.
I’ve also learned that I don’t like clean-cut, modern lines. I prefer a more organic, lived-in style.
Lesson learned!

We also didn’t finish the vanity in the way I’d prefer.
We needed at least a basic upgrade, so we painted the cabinets, added hardware, bought a cheap countertop and replaced the faucets. It doesn’t fit the vision I had, but it saved us $1,000 on an entirely new vanity.
This may be a project we redo down the road. For now, it works!
In the future, I want a wood-toned vanity with a gray countertop. I also can picture a runner rug in the center of the floor for an elevated look too.
What do you think??
I may paint our mirrors gold to add warmth to that area.

I’m making it my life’s mission to never take so long to remodel a space ever again.
We hastily jumped into this green bathroom project because it was an emergency situation. We had to spread out the rest of the room updates because we had higher priorities elsewhere in our home.
In the future, I hope that we can intentionally plan every phase of the remodel and do it all at once. I’m sure this will save us a lot of time and money too.
We have a few final details to finish up, like securing our tub and countertop with silicone to keep them from wiggling. And caulking one spot on the ceiling I missed after painting it.
Will we finish that last 1%? WHO KNOWS.
Shop This Bathroom
Here are all the links and sources for items in this room. I hope they spark new ideas and inspire you in your own home.


Be sure to check our our Pink Bathroom DIY remodel next!