
Today I’m sharing how to take your new shiplap from sitting in your garage to fully installed and painted. I’ve used three different painting methods for shiplap in my home! With the right technique, each finish turned out great. Let’s go!

- Tools & Materials Needed
- Step 1: Prep For Paint
- Step 2: Paint The Edges
- Step 3: Install The Shiplap
- Step 4: Final Paint Coat
Tools & Materials Needed
TOOLS
- Soft Paint Brush
- Foam or Flocked Paint Roller
- Tackcloth
- 120 and 220 Grit sandpaper
- Paint Sprayer (Optional)
- Painter’s Tape
- Paint Drop Cloths
- Shopvac
MATERIALS
- Wood Filler
- Paint Primer (BIN or Bullseye)
- Paint – I recommend Behr Urethane Alkyd in a Semi-Gloss
Step 1: Prep For Paint
If you want your Shiplap to look good, prep is key.
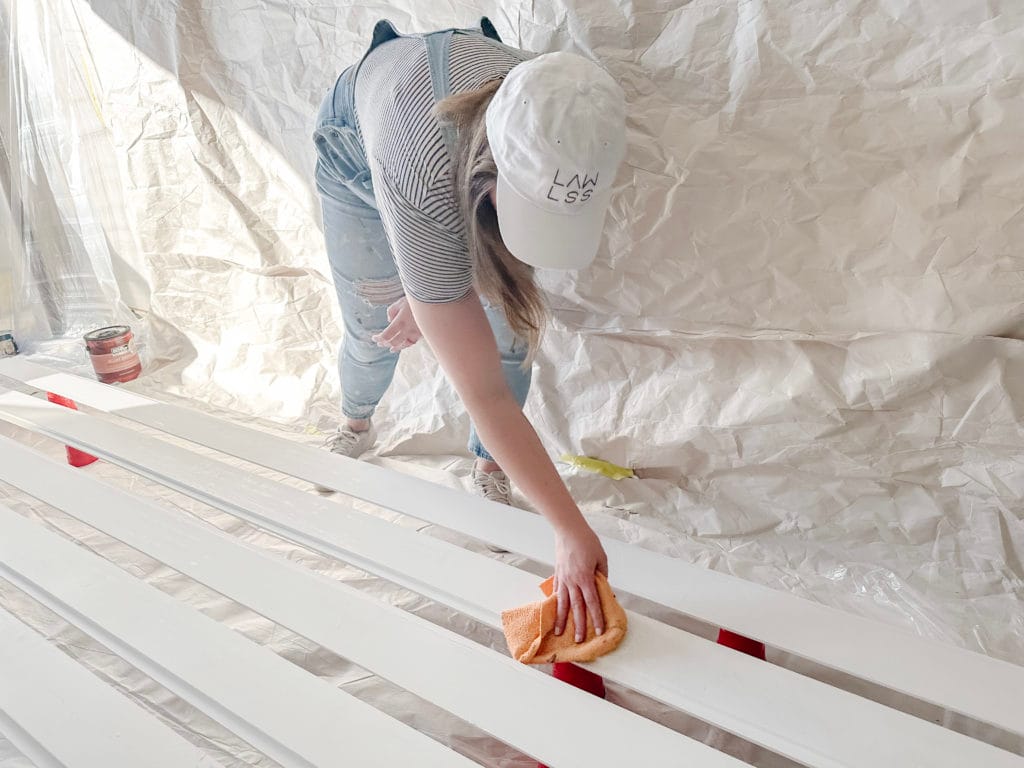
A. Fill all indentions with wood filler.
First, fill in all the dings or scratches with wood filler using a putty knife. Slightly overfill, but not too much. It will be sanded down once it’s dry. For a rugged look, leave the dings and imperfections for added character.
B. Sand and dust.
Next, sand off any excess wood filler once dry to make the nail holes invisible after you add paint. If you’re using pre-primed boards, I’d recommend a 220 fine grit sandpaper so it doesn’t scratch the surface too much. Remove any dust or debris on the boards that could affect your final finish. You can use a sticky tack cloth or vacuum the boards with a ShopVac with an attachment.
C. Prime with a quality primer.
Then, use a foam roller or paint brush to apply 1-2 coats of BIN Primer. Once the primer is dry, sand the brush marks smooth lightly with 220 grit sandpaper.
DIY Tip: You Always Need Primer!

Step 2: Paint The Edges
Next, use a soft paint brush to coat both edges and the lip of each shiplap board. It’s nearly impossible to get a wet paint brush in the small gap between boards after they’re installed. Especially when it’s high up on a wall. Painting the edges before you install them will save you a major headache later.
If you’re painting your shiplap white, you can probably skip this step. For any other color, I highly recommend doing this.
Step 3: Install The Shiplap
Once your boards are prepped and primed, it’s time to install the shiplap. If you’re not sure how, find all these steps here!

Step 4: Final Paint Coat
Next, you’re ready for the final coat of paint! Your boards might look rough at this point but they’re about to look incredible. There are there different ways you can paint your shiplap at this point. I’ve laid out instructions for each method below.
Choose which method works best for you below:
Method 1: Brush + Roller Painting Shiplap Steps
How To:
1. First, set out a paint tarp over your floors, furniture, etc. to protect them from drips and splatter.
2. Next, use a saturated foam or flocked roller to lightly coat each Shiplap Board. Work in small sections and try not to back-brush.
3. Then, use a soft paint brush as needed in corners, over trim, etc.
I highly recommend going over your brush marks lightly with a saturated foam roller immediately. This helps eliminate the brush marks. If you notice small bubbles forming from the foam roller, it needs more paint on it.
Method 2: Sprayer Painting Shiplap Steps
Best used for larger projects, or when you want to ensure the best finish.
How to:
1. First, cover all floors, furniture, light fixtures, and anything you don’t want painted with plastic sheeting and painters tape. This protects from overspray and drips.
2. Next, put on your protective gear. Suit up and don’t forget your respirator mask. These protect your eyes and lungs from harmful chemicals from the paint particles in the air.
3. Once the room is prepped, follow your paint sprayer’s instructions to start painting.
A few helpful tips I’ve learned through practice is…
– Move at a medium pace across the surface of your boards.
– Keep an equal distance between the board and the sprayer at all times. This will create an even finish.
– Pull the trigger once you’re already in motion, moving along your boards. This will prevent an initial paint splatter on your board.
– If you notice paint drippings or paint pooling, you’re moving too slowly. If you notice pulsing lines, you’re moving too quickly.
– You will probably need 1-2 light coats of paint. Check your specific paint for dry times. Mine needed a full 24 hours between coats.
Is A Sprayer Better for Painting Shiplap?
Both brushing/rolling or using a paint sprayer can give you a great finish on your painted shiplap! I’ve had success with both. Variables like temperature of the room, humidity, and air flow can change how the paint finish turns out. Using a brush and roller is faster but I find I still get inconsistent results. When I want a guaranteed finish, I turn to a paint sprayer.
Brushing Shiplap Tips:
I painted our green bathroom shiplap with a roller and brush, and was able to get a smooth finish. I painted in small sections with a brush, and then used a saturated foam roller to lightly go over all the brush marks. You can also use the roller directly. Just be careful to not use too much paint in the roller because it will create drips.
The trick to not getting brush marks is to not back-brush! Only go over a section once or twice. The more you back-brush, the higher chance of getting brush marks in the end. Use light paint coats for the best finish.

Spraying Shiplap Tips:
I’ve found that using a paint sprayer takes the same amount of time! Once the area is prepped, the actual spraying step is surprisingly quick. A paint sprayer is a tool that takes time and practice to get better at. I expected to not be great at it at first. I was able to figure out how quickly to move the sprayer to not overspray or underspray, and to get a feel for how messy it would be. We just used this affordable paint sprayer!
I followed the Sprayer instructions and ended up with a fantastic finish. Much better than using a roller or a brush.

What Kind of Paint is Best for Painting Shiplap?
I use Behr Urethane Alkyd Paint from Home Depot on my trim, doors, shiplap, and cabinets. I’ve used it in every remodel update! It flows to hide brush marks and cures to a hard finish after 30 days. Lots of people have recommended Benjamin Moore Advance. I’ll try this next and report back! I recommend spending extra to get a premium quality paint. It makes a huge difference in the amount of paint that you need to use, and in the final finish.
What Paint Finish Should You Use on Shiplap?
I use a Semi-Gloss for all trim, cabinets, doors, and wood! Gloss acts as a protectant from dirt, foot traffic, and moisture. This makes is more durable and easier to clean.

Can I fully paint by shiplap before installing it?
Definitely! If you fully paint your Shiplap before installing, just be careful not to damage the paint finish as you install them. Use a tiny amount of wood filler in the nail holes afterwards. Wipe excess wood filler off with a damp paper towel to avoid sanding. Add a drop of paint with a small paint brush or Q-tip once the wood filler is dry.
I prefer to add the final paint coats after installation because I can do a better job of hiding the nail holes, caulk, and cuts. I also find that the shiplap boards get dirty during the installation process. When we installed our white shiplap ceiling, by the time the boards were actually on the ceiling, they were covered in dirty handprints and dust. My darker green shiplap boards held up fine though! It may just depend on how dark of a color you choose.

What questions do you have about painting Shiplap??
Read Next >>
The Definitive Guide To Ceiling Shiplap Design