
Today I’m sharing a quick grout how to guide for tiling a bathroom floor! Grouting is the most satisfying part of the whole tiling process. It’s when you get to see all your design choices come together! It’s a very beginner-friendly DIY, as long as you know these important tips below.

See also…
- How to tile on a wood subfloor
- How to tile a bathroom floor
- Installing cement backer board
- Replacing a subfloor under a leaking toilet
Types Of Grout
There are four main types of grout: epoxy, acrylic, sanded, and unsanded. Here are a few resources to help you choose which is best for your project…
- Grout 101 by FireClay Tile
- Types of Grout by Home Depot
- Types of Grout by Mapei
- Sanded Vs. Unsanded Grout By Rubi.com
- 7 Types of Grout by The Spruce
I highly recommend using a premium grout. In this case, higher quality means your grout will last longer and ensure your tile floor will look nice for years to come. It will also require less cleaning/maintenance. No one enjoys scrubbing dirty grout every 6 months!
My Favorite Grout: Mapei FlexColor CQ
I’ve used Mapei FlexColor CQ for every tile project I’ve done (three bathrooms) and had great experiences with it!
It’s a pre-mixed acrylic grout. It doesn’t require a sealant, but it can be added if you want. This grout is made with quartz aggregate so it has excellent color consistency, is very durable, and is professionally rated for interior/exterior use and for residential or commercial installations. It’s stain and mold resistant, and comes in a variety of colors. It’s rated for tile joints 1/8″ or less. With a gentle application, it won’t scratch your tiles. I highly recommend this brand and specific grout if it works for your project!

Before purchasing your grout, make sure it’s compatible with your tile (ceramic, porcelain, natural stone, etc.).
Step-By-Step Grout How To
Once your tile is installed and and dried for 24 hours, your floor is ready for grout!
Tools & Materials Needed
- Grout of choice
- Mixing tools, if needed
- Grout Float
- Grout Sponge
- Toothpicks or Small Screwdriver
Step 1: Mix Your Grout.
Check the instructions on the bag or on the brand’s website’s install guide. Use a plastic bucket and a paddle mixer drill attachment to mix the grout to the right consistency. If you’re grout is pre-mixed, you can skip this step.
Step 2: Choose Your Starting Point.
Similar to tiling, you don’t want to grout yourself into a corner. Start in the back corner of the room and work in a small sections at a time.

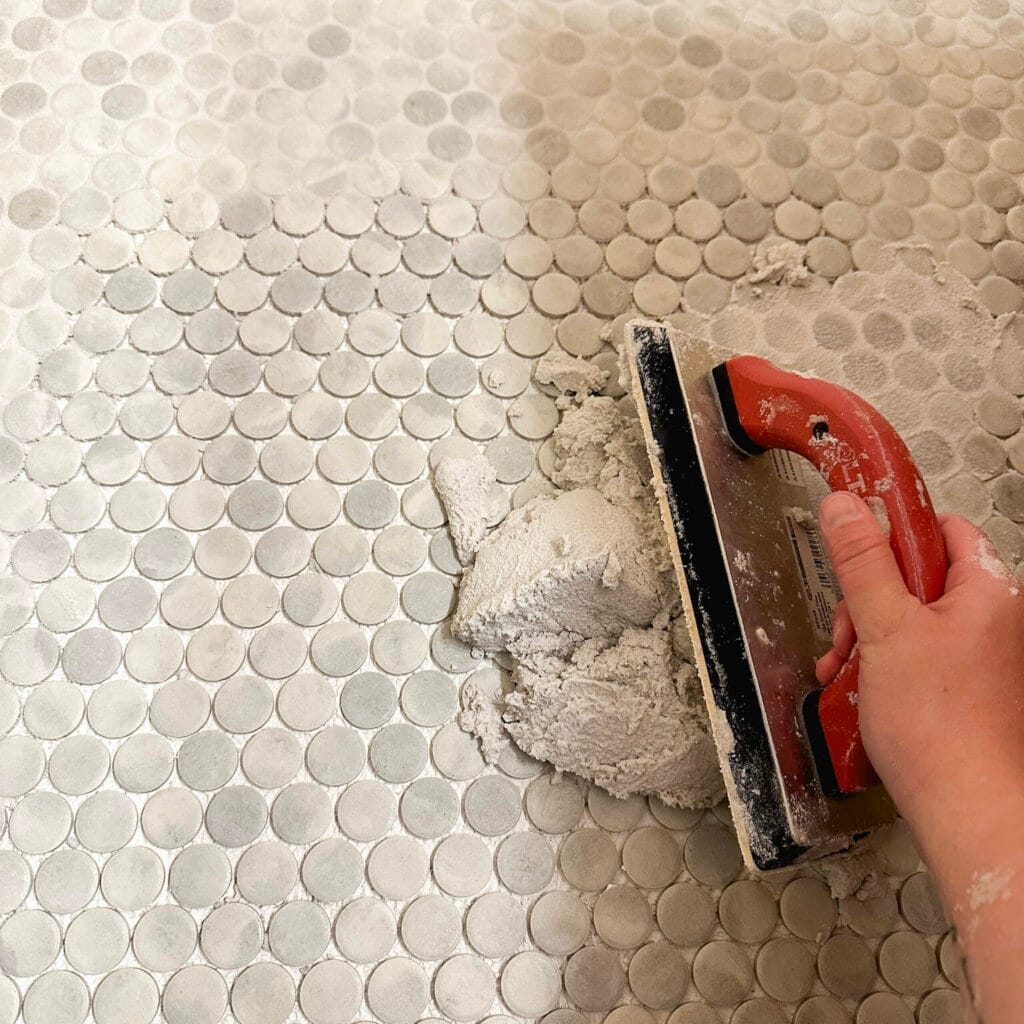
Step 3: Add Grout to the Floor.
Use a grout float to scoop the grout out of the bucket and apply it directly onto the tiles.

Using the edge of the grout float, push it around and get it fully in between the tiles. Apply light pressure at a 45 degree angle. If using sanded grout, be gentle so you don’t scratch the tiles.

Work in small sections so you can clean the tiles as you go (see next step below).
Step 4: Clean Off Tiles.
Cleaning the tiles is the longest step in the grouting process. This is important so you don’t get grout haze left on top of your tiles. This is a hazy, tacky film that can be left behind on the surface of your tiles if the tiles aren’t properly cleaned during the grouting process. It can be difficult to remove once it’s dried. You’ve made it this far, don’t ruin your tile job by skimping out on this step!
Once you’ve grouted a small section of tile, gently push any excess grout off the tiles.

Use a slightly damp grout sponge to wipe off the excess grout off the top of the tiles.
Gently move the sponge over the tiles in small swipes, flipping the sponge over for a clean edge for each swipe. Rinse the sponge in a bucket of clean water, and repeat until all the excess grout has been removed.
At this point, your tiles should look clean and you should be able to see all the tile edges, although the grout can still sit high near the top of the tiles.
After 15 minutes, wipe the top of the tiles again. (Check your product instructions for specific timing here.) While you do this, use the sponge to gently go over the grout line to smooth it out in between the tiles, just below the top of the tiles.

Continue to rinse and reuse the grout sponge to remove all excess grout until the tiles look clean.
Step 5: Remove Grout Haze.
60 minutes after application (again, check your product instructions for specific timing), use the grout sponge to wipe off the tiles one more time.
Take your time and be thorough in this process! Grout haze is so hard to remove after it’s dried. Now is the time to get it off your beautiful tile.
Grout How To Tip
Quick Grout How To: Next Steps
After you’ve grouted your entire floor, let it dry (about 24 hours) before allowing light traffic. Once it’s dry, you can start reinstalling all your finishes like the toilet, tub, vanity, baseboards, etc.

If your grout is compatible, you can seal your grout for additional stain resistance. Check the product install guide to see when you can do this.
I hope this quick grout how to guide is helpful with your DIY project. Please share a picture of your finished tile floor below! I would love to see your project and cheer you on!