Today I’m sharing about replacing a subfloor in an upstairs bathroom. We ignored a leaking toilet until it finally started dripping water into our basement below a few weeks ago. Yikes. This project took some effort, but is definitely doable!

Time needed: 3+ hours
Expertise level: Intermediate
Tools & Materials Needed:
- Reciprocating Saw
- Drill
- Pry bar
- Hammer
- Caulk Gun
- Hack Saw
- Framing Square
- Chalk or Pencil
- Mitre Saw or Table Saw
- Cover for toilet drain (to protect from sewer gas – we just used a rag)
- Subfloor Adhesive
- Construction Wood Screws
- Subfloor Plywood Replacement (check for your type printed underneath the subfloor panel, we used 23/32 OBS Plywood to match our current subfloor thickness)
- 2×8’s for bracing
- Toilet Flange, PVC pipe fitting, plumbing adhesive
Steps For Replacing A Subfloor – DIY
Replacing a subfloor is not the most glamorous DIY. But it can be necessary when there’s been water damage causing the subfloor to become soft and moldy. This is a common occurrence under toilets, unfortunately. A loose wax ring or loose bolts attaching the toilet to the floor can lead to small leaks overtime, which can wreak havoc on a subfloor.
If you notice extra moisture around your toilet, a musty smell, or leaking water below the bathroom, this is a sign to investigate what could be going on.
If you’re able to access beneath the bathroom floor like in an unfinished basement or crawl space, this makes it easier to identify issues. In finished spaces under the bathroom, you may notice water stains on the ceiling or drywall where the toilet sits above.
Replacing a damaged subfloor is important to maintain the integrity of your home’s structure. You don’t want your toilet sinking through the floor! Our subfloor was so damaged we could push a screw driver entirely through the board with very little effort. Yikes.
1. Remove all floor fixtures.
First, uninstall the toilet. Remove the baseboards close by, and anything else that will be in the way of the subfloor replacement. If the subfloor is damaged beyond the area of the toilet, you may need to remove the vanity or shower/tub, etc.

2. Remove the flooring.
To access the subfloor, carefully remove the flooring to expose the subfloor below. Depending on the type of flooring, you may be able to reuse it. Our bathroom had old tile that needed to go anyway (here’s how I removed ours in just an hour!).
If you find any backer board or waterproofing membrane, remove this too to expose the subfloor.
3. Remove the toilet flange.
We found it made the most sense to remove the toilet flange so we could cut a smaller hole for the pipe in the new floor patch. Plus ours was cracked anyway (maybe what was causing the leak?) and needed replacing. Using a hacksaw, we cut just below the flange and then blocked the pipe with a wet rag to prevent sewer gasses coming through.

4. Carefully Cut Out Damaged Subfloor.
Mark the damaged area to cut out using a square edge and chalk. Using a reciprocating saw or circular saw, carefully cut along the straight lines. Avoiding any pipes, wiring, or floor joists below. We drilled holes in the corners first so we could fit the reciprocating saw blade into place. Remove any nails from the floor joists below.
You may need to remove it in pieces to avoid cutting through the floor joist. Cut a section, smash it with a hammer to loosen it, and let it drop below or pull it up.
*DO NOT cut the floor joists below!!
5. Add Bracing For New Subfloor Seams.
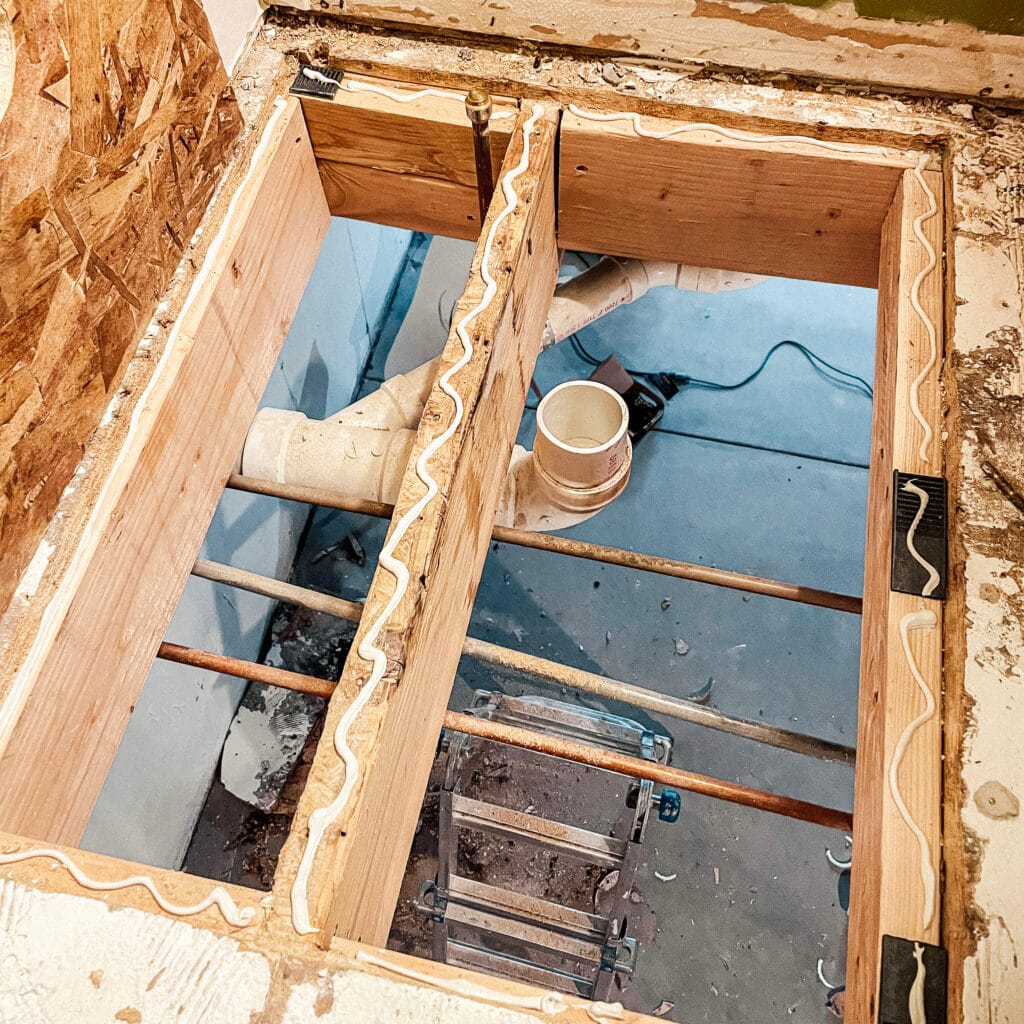
Frame out the edges where your new subfloor will go. We used 2×8’s between the floor joists. Positioning them under the lip of both the old and new subfloor. This will support the new subfloor so it can bear weight. It will also help limit movement, protecting the integrity of your new tile or flooring above.

6. Replace the Plumbing.
Set up the plumbing before you put your new subfloor in. After cutting off the old flange, we fit a coupling to extend the drain pipe back up through the floor with plenty of extra room on the pipe to fit the new flange once the final flooring is in. You can always cut your pipe shorter, but adding new pipe can be difficult.
We trimmed the drain pipe down from what you see in this picture below. Making sure we’ll have plenty of pipe to work with to retrofit the new flange on top of the new tile. After we installed the new subfloor, we placed the new toilet flange (without gluing it) on just to cap off the drain pipe from sewage gasses. After we add the new tile, we’ll trim the pipe so the flange sits directly flush on top of the tile.

7. Measure & Cut New Subfloor.
Measure the size of the subfloor hole and cut your new subfloor to size. Because our basement is unfinished, we could easily see the type of subfloor printed on each panel. We found the 23/32 OSB plywood we needed at Home Depot for under $30.
Fit the new subfloor piece and mark where your plumbing will come through (water line, drain pipe, etc.). Drill/cut the holes to accommodate the plumbing.
Try to be as precise as you can with your measurements. Leave a 1/8″ gap between the subfloor seams, and a 1/4″ gap by the wall to allow for expansion. See more tips below.
8. Level The Subfloor Seams.
A level and flat subfloor is incredibly important! An uneven subfloor can cause movement in the flooring that sits on top of it. This can result in cracked grout, tiles or wavy flooring. Prepping now is the key to a successful flooring install later.
Dry fit the new subfloor piece. Using a large level, add shims between the bracing and subfloor as needed until the seams are as even as possible. If you have large gaps between the seams, you can add shims in-between the panels too.
9. Install The New Subfloor.
Once your measurements and cuts are made, add strong construction glue to the top of the floor joists, new bracing, and shims. This will help minimize movement, protecting your flooring. It also helps prevent squeaking sounds when you walk on the floor. Win, win.

Set the new subfloor into place and press down firmly to help it adhere to the glue. Screw the subfloor into the bracing and joists below with construction screws. Place a screw every 6″ along the edges, and every 12″ in the center.
10. Next Steps – Prepping For Tile
We’ve got a little more work to do before I can start tiling! Despite our best efforts, the seams between our old and new subfloor are a little more uneven than what I want. So I’m going to use a floor leveling compound to fix it. Next, I’m going to clean up all the leftover thinset on the exposed subfloor from the old tile. I want to avoid any “crunching” sounds underneath our new tile.
Once the subfloor is cleaned up and level, I can start tiling!
Tips for Replacing a Subfloor
- Use the same thickness of plywood as the rest of the subfloor. If your basement or crawl space is unfinished, you can find a label on the plywood that says the type of plywood and thickness you need. We used 23/32 OBS plywood.
- It’s important to get the subfloor seam even and flat. Use shims as you install the subfloor as needed. If the seams are still uneven after install, you can sand them down or use a floor leveling compound to fix it.
- Leave a 1/8″ gap between the subfloor seams and a 1/4″ gap by the walls to allow for contraction or expansion.
- Stagger the subfloor seams to prevent weak spots. Never let 4 corners meet together!
- Movement caused by an uneven subfloor or by improper subfloor bracing can cause cracks in the grout or tiling. It’s super important to get the subfloor patch sturdy, stable, and even.
Follow along as we move forward in this project. I love tiling, and can’t wait for this room to get a little upgrade!
Replacing a subfloor can be a challenge, but I’m confident you can do it too. What questions do you have about this project? Comment below and I’ll answer them.


